Thursday, December 26, 2013

Jersey & JerseyTest migration from 1.x to 2.5 with Spring, JSP, Tomcat 7 and FreeMarker


I looked at upgrading to Jersey 2 a while ago but it didn't include important functionality I needed from the 1.x versions, like support for JSP templates, so I decided to wait (although I would have expected that a 2.0 release would have included all the capability from 1.x).

I recently went back and discovered that Jersey 2.5 now supports templates so I decided to take the plunge.  Just let me say that the experience has been very painful and end my rant there.  The high-level documentation is pretty good, and there are some useful working examples, but I had to dig into the Jersey source code to try to figure some things out and the low level documentation is not what I had hoped for.

Thus I am writing this article in hopes of sparing other poor souls from the pain I experienced in upgrading to Jersey 2 and getting the following combination of technologies integrated and working:

Jersey 2 + Jersey Test Framework + Spring + templates + Tomcat 7

If you're looking for information on Jersey 1.x please see my previous article on the Jersey Test Framework.

I had intended for JSP to be the template provider but I couldn't get it to work with the Jersey Test Framework (Grizzly2 container), which caused me to look at other options.  After much difficulty I was able to get FreeMarker working as the template provider, but without being able to include the Spring macro library (will explain alternative below).

First, let's look at the JerseyTest class.  Notice on line 8 the forward slash '/' in front of the folder name where I am putting the FreeMarker templates.  Please don't forget that.

At first I put my templates folder (call it whatever you want) at 'src/main/webapp/templates', which worked fine when the app was deployed to Tomcat but failed when the unit tests were being run under Grizzly2.  I then noticed in the Jersey source code for the FreeMarker examples and tests that they were putting the template files in the resources folder ('src/main/resources').  When I moved my .ftl files to that location FreeMarker could find them under both Tomcat and Grizzly.

As you can see from this snippet below, I've created my own abstract test class on top of JerseyTest so that I could have a shared configuration for all my web resource tests and include some other helper methods (not depicted) that help simplify my REST service tests.

public abstract class AbstractSpringEnabledWebServiceTest extends JerseyTest {

    @Override
    protected Application configure() {
        ResourceConfig rc = new ResourceConfig()
            .register(SpringLifecycleListener.class)
            .register(RequestContextFilter.class)
            .property(FreemarkerMvcFeature.TEMPLATES_BASE_PATH, "/templates")
            .register(FreemarkerMvcFeature.class)
            ;

        enable(TestProperties.LOG_TRAFFIC);
        enable(TestProperties.DUMP_ENTITY);

        return configure(rc);
    } // configure()

    protected abstract ResourceConfig configure(ResourceConfig rc);

    protected abstract String getResourcePath();

If you've used JerseyTest in Jersey 1.x you will notice some significant changes to how the tests are configured.  I'd like to say it's an improvement but I think you will agree it's much less intuitive.  In Jersey 1.x it was obvious we were building up a web.xml equivalent.  Not so in Jersey 2.  You'll have to rely more on the documentation, source code, blogs, and StackOverflow to to figure out how to set up your test web app correctly for your scenario.

Next is the concrete test class where we (a) provide the Jersey resource classes to load, (b) the location of the Spring context file to use, if using Spring, and (c) the root resource path, which should match the filter mapping from web.xml.

public class ResourceATest extends AbstractSpringEnabledWebServiceTest {

    @Override
    protected ResourceConfig configure(ResourceConfig rc) {
        rc.register(ResourceA.class)
            .property(
                "contextConfigLocation",
                "classpath:**/my-web-test-context.xml"
            );
        return rc;
    } // configure()

    @Override
    protected String getResourcePath() {
        return "/my/resource";
    } // getResourcePath()


Next, here's my web.xml:

<web-app version="2.4" xmlns:xsi="http://www.w3.org/2001/XMLSchema-instance"
    xmlns="http://java.sun.com/xml/ns/j2ee"
    xsi:schemalocation="http://java.sun.com/xml/ns/j2ee
                        http://java.sun.com/xml/ns/j2ee/web-app_2_4.xsd">

    <context-param>
        <param-name>contextConfigLocation</param-name>
        <param-value>classpath:/META-INF/spring/my-web-context.xml</param-value>
    </context-param>

    <context-param>
        <param-name>spring.profiles.default</param-name>
        <param-value>prod</param-value>
    </context-param>

    <!-- Spring -->
    <listener>
        <listener-class>org.springframework.web.context.ContextLoaderListener</listener-class>
    </listener>

    <listener>
        <listener-class>org.springframework.web.context.request.RequestContextListener</listener-class>
    </listener>

    <filter>
        <filter-name>My Jersey Services</filter-name>
        <filter-class>org.glassfish.jersey.servlet.ServletContainer</filter-class>

        <init-param>
            <param-name>jersey.config.server.provider.packages</param-name>
            <param-value>com.abc.resources.widget</param-value>
        </init-param>

        <init-param>
            <param-name>jersey.config.server.mvc.templateBasePath.jsp</param-name>
            <param-value>/WEB-INF/jsp</param-value>
        </init-param>

        <init-param>
            <param-name>jersey.config.server.mvc.templateBasePath.freemarker</param-name>
            <param-value>/templates</param-value>
        </init-param>
  
        <init-param>
            <param-name>jersey.config.server.mvc.templateBasePath.freemarker</param-name>
            <param-value>/templates</param-value>
        <init-param>
  
        <init-param>
            <param-name>jersey.config.server.provider.classnames</param-name>
            <param-value>org.glassfish.jersey.server.mvc.freemarker.FreemarkerMvcFeature</param-value>
        </init-param>
  
        <init-param>
            <param-name>jersey.config.server.tracing</param-name>
            <param-value>ALL</param-value>
        </init-param>

        <init-param>
            <param-name>jersey.config.servlet.filter.staticContentRegex</param-name>
            <param-value>(/index.jsp)|(/(content|(WEB-INF/jsp))/.*)</param-value>
        </init-param>

    </filter>

    <filter-mapping>
        <filter-name>My Jersey Services</filter-name>
        <url-pattern>/my/resource/*</url-pattern>
    </filter-mapping>

</web-app>

Here's my Jersey resource class.  Not much to call out here, except what I mentioned earlier about not being able to load the Spring FreeMarker macros.  In my case I wanted to use the spring.url macro as a replacement for c:url in JSP.  What I ended up doing in the short term is simply injecting the base url into my data map so I could then use it in my template.

@Service
@Path("/my/resource")
public class ResourceA{

    @Context
    private UriInfo _uriInfo;
    ...

    @Path("/resourceA")
    @Produces(MediaType.TEXT_HTML)
    @GET
    public Response getResourceA(@Context SecurityContext sc) {
        // fetch data for resource A

        // put data in map if it isn't already
        Map data = new HashMap<>();
        data.put("myData", data);
        data.put("baseUrl", _uriInfo.getBaseUri().toString());

        Viewable view = new Viewable("/myTemplate.ftl", data);

        return Response.ok().entity(view).build();
    } // getResourceA()

Finally is a snippet from my FreeMarker template file.  You can see the usage of 'baseUrl' that I included in the data model above.  One thing you might easily overlook is that I'm not using a 'model' prefix nor an 'it' prefix for the data elements.  In Jersey 1.x 'it' was required and the documentation for 2.5 states that the model will be passed in to the view as either 'model' or 'it'.  However, that didn't work and when I dropped the model prefix it started working.  Something to keep in mind as you troubleshoot any issues you may be having referencing your model data elements.

<head>
    <title>Web Resource A</title>
    <link href="${baseUrl}content/font-awesome/4.0.3/css/font-awesome.css"></link>        
         rel="stylesheet">
    <link href="${baseUrl}content/bootstrap/2.3.2/css/bootstrap.css"></link>        
         rel="stylesheet">
</head>

Oops - almost forgot the maven dependencies: (note: my spring dependencies are declared in my parent pom)

    <properties>
        <project.build.sourceEncoding>UTF-8</project.build.sourceEncoding>
        <servlet-api.version>2.4</servlet-api.version>
        <jersey.version>2.5</jersey.version>
        <jersey.scope>compile</jersey.scope>
        <jettison.version>1.3.3</jettison.version>
        <freemarker.version>2.3.20</freemarker.version>
    </properties>

    <dependencies>

        <dependency>
            <groupId>org.freemarker</groupId>
            <artifactId>freemarker</artifactId>
            <version>${freemarker.version}</version>
        </dependency>

        <dependency>
            <groupId>javax.servlet</groupId>
            <artifactId>servlet-api</artifactId>
            <version>${servlet-api.version}</version>
            <scope>provided</scope>
        </dependency>

        <dependency>
            <groupId>org.codehaus.jettison</groupId>
            <artifactId>jettison</artifactId>
            <version>${jettison.version}</version>
            <scope>provided</scope>
        </dependency>

        <dependency>
            <groupId>org.glassfish.jersey.test-framework</groupId>
            <artifactId>jersey-test-framework-core</artifactId>
            <version>${jersey.version}</version>
            <scope>test</scope>
        </dependency>

        <dependency>
            <groupId>org.glassfish.jersey.test-framework.providers</groupId>
            <artifactId>jersey-test-framework-provider-grizzly2</artifactId>
            <version>${jersey.version}</version>
            <scope>test</scope>
        </dependency>

        <!-- Required only when you are using JAX-RS Client -->
        <dependency>
            <groupId>org.glassfish.jersey.core</groupId>
            <artifactId>jersey-client</artifactId>
            <version>${jersey.version}</version>
            <scope>${jersey.scope}</scope>
        </dependency>

        <dependency>
            <groupId>org.glassfish.jersey.ext</groupId>
            <artifactId>jersey-mvc-freemarker</artifactId>
            <version>${jersey.version}</version>
            <scope>${jersey.scope}</scope>
        </dependency>

        <dependency>
            <groupId>org.glassfish.jersey.ext</groupId>
            <artifactId>jersey-spring3</artifactId>
            <version>${jersey.version}</version>
            <scope>${jersey.scope}</scope>
        </dependency>

    </dependencies>
Tuesday, August 6, 2013

Multiple content representations from a resource oriented RESTful web service

Here are a some thoughts on a few ways you can return multiple different representations of your resources from RESTful web services and still preserve the resource oriented nature of your architecture.

First, by representational differences I'm not talking about the format (JSON vs. XML, etc.). I'm talking about content.

Keep in mind that under the ROA style for REST you can use query params for selection, sorting and projection. Selection answers the question of which instances of the resource to return (which rows in database terms). Sorting is self-explanatory. Projection refers to which parts of the resource (which data points, or columns in database terms) to return.

So, when we're talking about multiple representations with respect to query params we're talking about projection.

Let's consider an example of a representation of a Customer resource with the following data points:
  • customer_id
  • first_name
  • last_name
  • address1
  • address2
  • city
  • state
  • zip
  • zip_plus_4
  • home_phone
  • mobile_phone
  • birth_date
  • birth_place
  • email_address
  • income
Now, imagine that the following URL returns a complete representation of the above Customer resource for a customer with customer_id 123:

        http://www.my-company.com/resources/customer/123

You will notice that we are doing selection, but we aren't using query params but rather putting the customer_id on the URL itself, which is a cleaner approach to REST.

Use projection via a query param

Now, what if a given client didn't want to consume all those data points and endure all the overhead associated with that.  If using a query param approach you could do something like this:

        http://www.my-company.com/resources/customer/123?include=customer_id,last_name,zip,email_address

The web service implementation for this would process the 'include' query param and build up a resource that included only those data points specified.  Under this approach you give the client maximum control of the resource representation.

Extract a sub-resource

Another way to obtain a subset of the Customer resource would be to extract a sub-resource.  For example, imagine we were only interested in the customer contact info consisting of customer_id, first_name, last_name, mobile_phone and email_address.  Then, we could use a URL like the following to obtain the contact information for the customer:

        http://www.my-company.com/resources/customer/123/contact_info

But, we've created a new URL endpoint, which may or may not be what we want.  How can we isolate the contact information without using query params and without changing the original customer URL?

Define a custom media type

Let's say we had defined a media type for the Customer resource as so:

        application/vnd.my-company.Customer-1.0

The client would pass this in as the Accept header to fetch the complete representation.  To isolate the contact information we could define a new media type like so and pass that in as the Accept header with the original URL:

        application/vnd.my-company.Customer.ContactInfo-1.0

Now, let's say the client is happy with the original customer representation, but wants to trim the size of it.  We could create a 'lite' version with abbreviated attribute names, such as lname for last_name, email for email_address and so on, and use a media type like the following to retrieve it:

        application/vnd.my-company.Customer-1.0-lite

You should be able to see the flexibility that custom media types provide.  You could create many different subsets of customer information and expose those as different flavors of the Customer media type.

Each of the above relies on being able to vary the resource representation independently from any object model supporting it.  See this article for more information.

Friday, August 2, 2013

RESTful Java Web Service Marshalling Comparison

 The case against automatic marshalling

I've been meaning to write this post for a very, very long time but I guess it was the look I got yesterday in a meeting when I recommended against automatically marshalling JAXB annotated model objects that pushed me over the edge. It was a look of "why would you even consider doing anything else?".

The notion that I can add a few annotations to my domain model class, make that the return type from my web service method and, viola, JSON or XML is magically returned to the client is very enticing. And you can certainly understand why developers would be motivated to want to do that.

But I'd like to offer some food for thought on why that might not be such a good idea and why architects, designers, those having to maintain the system and whoever's paying the bills should consider not allowing this approach in all but proof of concept or prototyping situations.

The first two problems, which are also the most significant, are very closely related:

Problem #1 : The inability to produce different representations from the same object model. I'm not talking about JSON vs. XML here (i.e. format). I'm talking about content and structure. You can only have one return type from a method and you can only mark up a given model class with annotations in one way. So, let's say you have client A that wants the full object representation returned - you're fine. But what if you have a client B that needs a different representation of that object? Perhaps fewer fields or abbreviated attribute names or some other subset of the object. You can't do it with automatic marshalling and use the same endpoint and without bloating the object model.  See this article for some ideas on how to produce multiple different representations from the same object model.

Problem #2 : The inability to support multiple versions of the REST contract off of the same object model. This one has the same root cause as above but a different use case for getting there. In this case I'm referring to changes to the object model that cause existing clients to break - breaking changes. In this case you can't simply reuse the same model class to support two incompatible representations of it - you have to create or extend a new model class. But, if you simply decoupled the REST response from your object model (i.e. don't use JAXB annotations and automatic marshalling) you can vary them independently and support multiple versions of your REST contract from the same object model - or at least you have the possibility of doing that, depending on the nature and extent of the changes.  Or, even simpler, maybe it's the REST contract itself that's changing (different attribute names, different structure, exposing fewer data elements due to a removed business feature, etc. etc.).  Auto marshalling can't expose two different contracts off the same object model.

Either one of those should be enough to discourage folks from using automatic marshalling in most cases, but there are still more reasons to avoid this approach...

Problem #3 : Your REST contract, and therefore your client, is tightly coupled to your domain/object model. You've basically opened up a window into the deep internals of your system and are allowing clients to peer into it. Some folks try to get around this by creating a secondary model object layer - a data transfer object layer, if you will - but they're still tighly coupled to a particular instance of a particular object model, they've bloated the overall object model, and they've greatly increased the object count at runtime.

Problem #4 : You lose control of the HTTP response and you won't have an opportunity to catch or log what just happened if there is a problem marshalling or unmarshalling your object.  In this case, the framework generates the exception and resulting response to the client - not your code - which is probably something you don't want to have happen.

Problem #5 : This is a consequence of attribute annotations in general in that they couple the classes being annotated to a particular use, albeit perhaps only logically. But, the implications of doing this can manifest themselves in very concrete ways. Let's say, for example, that RESTful representations and JMS messages are being created from the same model and let's say that the structure of the REST representation and the JMS message are different. OK, so you JAXB annotate the model classes for the REST layer and then the messaging team handcrafts the JMS messages from the same model - that will work and everything is fine. But, what if the messaging team needs to change the model layer to support some new changes to messaging and let's say these changes are breaking changes to the REST layer. Oops. This is really a variation of problems 1 and 2 above. Putting aside this contrived example, the key difference here is that we're introducing another developer (messaging team) who is unaware that the object model they are using in a loosely coupled manner has been tightly coupled by the web services team to their clients (changes to the model classes percolate all the way down to the REST clients).

Problem #6 : Clarity.  When you look at the web service class it's unclear precisely what's being returned and in what format.  Sure, you can see what object type it is, and you can look that up and examine it, but changes to the model will go unnoticed when looking at the web service.  You should be able to look at your web service class and see the entire contract that your service is providing.

Problem #7 :  The ability to fully enforce the REST contract.  Since changes to the model pass straight thru the web service layer you can't enforce the resource representation aspects of the REST contract.  However, if you decouple the model from the representation being returned (i.e. hand build the response) you have complete control over the contract.

Problem #8 : Reduced ability to refactor the service and domain layers.  Because the client is tightly coupled to the model you lose the ability to independently vary the model and thus are limited in your ability to refactor the system in a way that preserves the REST contract with existing clients.

Problem #9 : Extensibility of the REST contract.  This is a variation of #1 and #2, but from a different perspective.  If using auto marshalling you can't provide a different REST contract to different clients using the same underlying model.  Nor could you extend the contract to another system that makes use of auto marshalling (perhaps you want to use the adapter pattern on an inherited system to make it appear to have the same interface as yours - a consideration for growing and expanding companies and the kind of things architects are tasked with worrying about and considering).

Problem #10 : Lack of flexibility.  By using auto marshalling you lose the ability to compose a composite resource representation from multiple top-level objects.  In addition, nested hierarchies may or may not behave the way we necessarily want with auto marshalling.

Problem #11 : Time Savings.  It's not a tremendous coding time saver - not enough to justify introducing all the other problems mentioned here, despite what people may think.  It takes very little effort to code up a JSONObject or an XML document and just a little bit more to create a generic abstraction layer on top of that so you can produce JSON or XML or whatever.

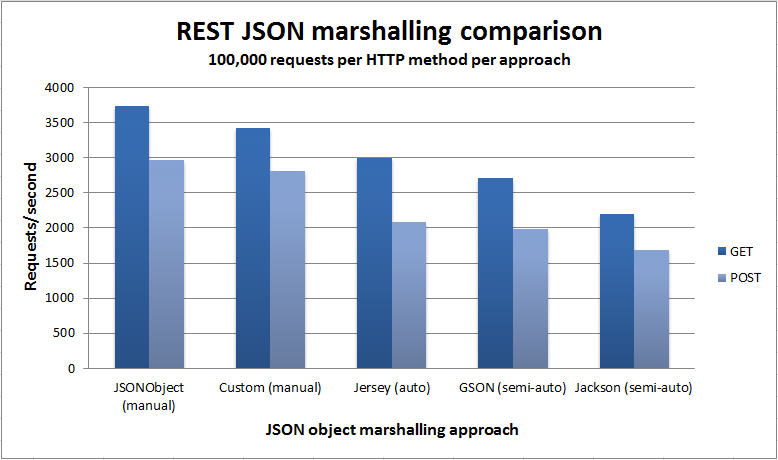
Problem #12 : Performance.  I decided to take a closer look at the performance of various approaches for sending and receiving JSON representations to/from a RESTful web service.  I used the Jersey Test Framework to create a unit test that invoked the handler methods to GET and POST JSON data to/from the same underlying model object.  The only difference was the approach used to map the JSON to/from the underlying object.  The object itself consisted of a String field and a couple of int fields (see below).

The test iterated over each approach in a round robin fashion performing a GET and a POST.  That cycle was repeated 100,000 times. The metrics were captured in the unit test client, encompassing the entire request/response.  Here are the approaches that were evaluated:
  • Manually building the response using org.codehaus.jettison.json.JSONObject (ver 1.1)
  • Manually building the response using a custom implementation using StringBuilder (Java 1.7)
  • Automatic marshalling using the Jersey framework (ver 1.17) and underlying JAXB implementation
  • Instructing a com.google.gson.Gson (ver 2.2.2) instance to map an object to JSON  for us
  • Instructing a org.codehaus.jackson.map.ObjectMapper (ver 1.9.2) instance to map for us
As you can see from the chart below, the manual approaches to handling the JSON/object mapping were quite a bit better performing, and that makes sense as they don't have to use reflection to access the object and build up the response.  What was interesting was just how much better performing the manual approaches were.  That may or not be an important consideration depending on your situation, but it's information you should be armed with nonetheless and I encourage you to perform your own testing to see for yourself.  The best I can tell here is that the margin of error is about 5% as both manual approaches used the same POST handler yet the results for them differ by about 5%.  So, again, conduct your own tests in your own environment to see how the numbers shake out for you.

Marshalling Performance Comparison
Here's the interesting code from the web service showing the different approaches used. First is a complete POST handler. Each POST implementation is the same except for the mechanism used to turn the data into an ItemInventory object. I used custom media types to map to the various handlers, reusing the same URL/endpoint and in effect versioning the service.

Jersey :
@Path("/item")
    @Consumes(ITEM_INVENTORY_MEDIA_TYPE_JERSEY_JSON)
    @POST
    public Response createItemInventory2(ItemInventory inventory) {
        Response response = null;

        try {
            inventory = _inventoryManager.saveItemInventory(inventory);

            response = Response.status(201)
                .header(
                    "Location",
                    String.format(
                        "%s/%s",
                        _uriInfo.getAbsolutePath().toString(),
                        inventory.getItemId()
                    )
                )
                .entity(inventory.getItemId())
                .build();
        } catch (Exception e) {
            response = Response.status(500).entity(e.getMessage()).build();
        }

        return response;
    } // createItemInventory()


org.codehaus.jackson.map.ObjectMapper:
@Path("/item")
    @Consumes(ITEM_INVENTORY_MEDIA_TYPE_JACKSON_JSON)
    @POST
    public Response createItemInventory3(String data) {
        Response response = null;

        try {
            ItemInventory inventory = new ObjectMapper().readValue(data, ItemInventory.class);
            inventory = _inventoryManager.saveItemInventory(inventory);

com.google.gson.Gson:
@Path("/item")
    @Consumes(ITEM_INVENTORY_MEDIA_TYPE_GSON_JSON)
    @POST
    public Response createItemInventory5(String data) {
        Response response = null;

        try {
            Gson gson = new Gson();
            ItemInventory inventory = gson.fromJson(data, ItemInventory.class);
            inventory = _inventoryManager.saveItemInventory(inventory);

JSONObject (for the POST I did not write a custom handler, but instead used JSONObject):
@Path("/item")
    @Consumes({
                  ITEM_INVENTORY_MEDIA_TYPE_JSONOBJECT_JSON,
                  ITEM_INVENTORY_MEDIA_TYPE_CUSTOM_JSON
              })
    @POST
    public Response createItemInventory(String data) {
        Response response = null;

        try {
            ItemInventory inventory = jsonObjectToItemInventory(data);
            inventory = _inventoryManager.saveItemInventory(inventory);

...

    private ItemInventory jsonObjectToItemInventory(String data)
        throws JSONException {
        JSONObject jo = new JSONObject(data);
        ItemInventory inventory = new ItemInventory(
            jo.isNull("id") ? null : jo.getString("id"),
            jo.getInt("onhand"),
            jo.getInt("onOrder")
        );
        return inventory;
    } // jsonObjectToItemInventory()


Now for a complete GET handler, this time for Jersey:
@Path("/item/{itemId}")
    @Produces(ITEM_INVENTORY_MEDIA_TYPE_JERSEY_JSON)
    @GET
    public ItemInventory getItemInventory2(@PathParam("itemId") String itemId) {
        ItemInventory inv = null;

        try {
            inv = _inventoryManager.getItemInventory(itemId);

            if (null == inv) {
                throw new WebApplicationException(404);
            }
        } catch (Exception e) {
            throw new WebApplicationException(e, 500);
        }

        return inv;
    } // getItemInventory2()


org.codehaus.jackson.map.ObjectMapper:
@Path("/item/{itemId}")
    @Produces(ITEM_INVENTORY_MEDIA_TYPE_JACKSON_JSON)
    @GET
    public Response getItemInventory3(@PathParam("itemId") String itemId) {
        Response response = null;

        try {
            ItemInventory inv = _inventoryManager.getItemInventory(itemId);

            if (null == inv) {
                // not found
                response = Response.status(404).build();
            } else {
                String json = new ObjectMapper().writeValueAsString(inv);
                response = Response.ok().entity(json).build();
            }

com.google.gson.Gson:
@Path("/item/{itemId}")
    @Produces(ITEM_INVENTORY_MEDIA_TYPE_GSON_JSON)
    @GET
    public Response getItemInventory5(@PathParam("itemId") String itemId) {
        Response response = null;

        try {
            ItemInventory inv = _inventoryManager.getItemInventory(itemId);

            if (null == inv) {
                // not found
                response = Response.status(404).build();
            } else {
                Gson gson = new Gson();
                response = Response.ok().entity(gson.toJson(inv)).build();

JSONObject:
@Path("/item/{itemId}")
    @Produces(ITEM_INVENTORY_MEDIA_TYPE_JSONOBJECT_JSON)
    @GET
    public Response getItemInventory(@PathParam("itemId") String itemId) {
        Response response = null;

        try {
            ItemInventory inv = _inventoryManager.getItemInventory(itemId);

            if (null == inv) {
                // not found
                response = Response.status(404).build();
            } else {
                JSONObject jo = new JSONObject();
                jo.put("id", inv.getItemId());
                jo.put("onhand", inv.getOnhand());
                jo.put("onOrder", inv.getOnOrder());
                response = Response.ok().entity(jo.toString()).build();
            }

And finally the custom handler. JsonBuilder is my own helper class that provides JSON formatting and uses a StringBuilder internally:
@Path("/item/{itemId}")
    @Produces(ITEM_INVENTORY_MEDIA_TYPE_CUSTOM_JSON)
    @GET
    public Response getItemInventory4(@PathParam("itemId") String itemId) {
        Response response = null;

        try {
            ItemInventory inv = _inventoryManager.getItemInventory(itemId);

            if (null == inv) {
                // not found
                response = Response.status(404).build();
            } else {
                JsonBuilder jb = new JsonBuilder();
                jb.beginObject();

                jb.addAttribute("id", inv.getItemId());
                jb.addAttribute("onhand", inv.getOnhand());
                jb.addAttribute("onOrder", inv.getOnOrder());

                response = Response.ok().entity(jb.toString()).build();

If you're interested in the custom media types here's what they look like:
public static final String ITEM_INVENTORY_MEDIA_TYPE
        = "application/vnd.my-org.item.inventory";

    public static final String ITEM_INVENTORY_MEDIA_TYPE_JSONOBJECT_JSON
        = ITEM_INVENTORY_MEDIA_TYPE + ".JSONOBJECT+json";

    public static final String ITEM_INVENTORY_MEDIA_TYPE_JERSEY_JSON
        = ITEM_INVENTORY_MEDIA_TYPE + ".JERSEY+json";

    public static final String ITEM_INVENTORY_MEDIA_TYPE_JACKSON_JSON
        = ITEM_INVENTORY_MEDIA_TYPE + ".JACKSON+json";

    public static final String ITEM_INVENTORY_MEDIA_TYPE_CUSTOM_JSON
        = ITEM_INVENTORY_MEDIA_TYPE + ".CUSTOM+json";

    public static final String ITEM_INVENTORY_MEDIA_TYPE_GSON_JSON
        = ITEM_INVENTORY_MEDIA_TYPE + ".GSON+json";

Here's the JUnit test method used to exercise the above web service handlers:
@Test
    public void testCreateVersion2() throws InterruptedException {
        int onhand = 35;
        int onOrder = 3;

        int iterations = 100000;

        JSONObject resource = new JSONObject();
        try {
            String[] mediaTypes = {
                InventoryWebService.ITEM_INVENTORY_MEDIA_TYPE_CUSTOM_JSON,
                InventoryWebService.ITEM_INVENTORY_MEDIA_TYPE_JSONOBJECT_JSON,
                InventoryWebService.ITEM_INVENTORY_MEDIA_TYPE_JACKSON_JSON,
                InventoryWebService.ITEM_INVENTORY_MEDIA_TYPE_JERSEY_JSON,
                InventoryWebService.ITEM_INVENTORY_MEDIA_TYPE_GSON_JSON
            };

            long[][] timers = { {0, 0, 0, 0, 0}, {0, 0, 0, 0, 0} };

            // get the plumbing working 1st time
            WrappedClientResponse response = post(
                "/inventory/item",
                mediaTypes[0],
                resource.toString()
            );


            for (int i = 0; i < iterations; i++) {
                for (int j = 0; j < mediaTypes.length; j++) {
                    resource.remove("id");
                    resource.remove("itemId");
                    resource.put("onhand", onhand);
                    resource.put("onOrder", onOrder);

                    response = post(
                        "/inventory/item",
                        mediaTypes[j],
                        resource.toString()
                    );

                    timers[TIMER_POST][j] += response.getResponseTime();

                    assertEquals(201, response.getStatus());
                    assertNotNull(response.getHeaders().get("Location"));
                    String itemId = response.getEntity(String.class);

                    // now check to make sure we can fetch the item we just created
                    response = get(
                        String.format("/inventory/item/%s", itemId),
                        mediaTypes[j]
                    );

                    timers[TIMER_GET][j] += response.getResponseTime();

                    assertEquals(200, response.getStatus());
                    resource = new JSONObject(response.getEntity(String.class));
                    assertEquals(35, resource.getInt("onhand"));
                    assertEquals(3, resource.getInt("onOrder"));
                } // for
            }
            showStats(iterations, timers, mediaTypes);
        } catch (JSONException e) {
            fail(e.getMessage());
        }
        Thread.sleep(1000);
    } // testCreateVersion2()
Here are the convenience methods used by the tests to execute the HTTP requests and capture the metrics:
protected WrappedClientResponse get(String uri, String mediaType) {
        if (StringUtils.isEmpty(uri) || StringUtils.isEmpty(mediaType)) {
            throw new IllegalArgumentException("Programming error - required param missing");
        }

        WebResource resource = resource().path(uri);
        WebResource.Builder builder = resource.accept(mediaType);
        long start = System.currentTimeMillis();
        ClientResponse response = builder.get(ClientResponse.class);
        long stop = System.currentTimeMillis();

        WrappedClientResponse wrappedResponse = new WrappedClientResponse(response, stop - start);

        trace(response);

        return wrappedResponse;
    } // get()

    protected WrappedClientResponse post(String uri, String mediaType, String data) {
        if (StringUtils.isEmpty(uri) || StringUtils.isEmpty(mediaType) || StringUtils.isEmpty(data)) {
            throw new IllegalArgumentException("Programming error - required param missing");
        }

        WebResource resource = resource().path(uri);
        WebResource.Builder builder = resource.header("Content-Type", mediaType);
        long start = System.currentTimeMillis();
        ClientResponse response = builder.post(ClientResponse.class, data);
        long stop = System.currentTimeMillis();
        WrappedClientResponse wrappedResponse = new WrappedClientResponse(response, stop - start);

        trace(response);

        return wrappedResponse;
    } // post()

Here's the model class used for the testing:

@XmlRootElement
public class ItemInventory {

    private static final long serialVersionUID = -4142709485529021223L;

    // item ID
    @SerializedName("itemId")
    private String _itemId;
    public String getItemId() { return _itemId; }
    public void setItemId(String itemId) { _itemId = itemId; }

    // onhand
    @SerializedName("onhand")
    private int _onhand;
    public int getOnhand() { return _onhand; }
    public void setOnhand(int onhand) { _onhand = onhand; }

    // on order
    @SerializedName("onOrder")
    private int _onOrder;
    public int  getOnOrder() { return _onOrder; }
    public void setOnOrder(int  onOrder) { _onOrder = onOrder; }

    public ItemInventory() {}

    public ItemInventory(String itemId, int onhand, int onOrder) {
        _itemId = itemId;
        _onhand = onhand;
        _onOrder = onOrder;
    } // constructor

} // class ItemInventory

See this article to learn more about the Jersey Test Framework.

Friday, March 1, 2013

Increase quality and productivity with the Jersey Test Framework

Note:  This article applies to Jersey 1.x.  If you're looking for information on how to use the Jersey Test Framework in Jersey 2 please see this more recent article.

With the Jersey test framework developers can increase the quality of their software as well as their productivity without leaving the comfort of their favorite IDE.

The framework spins up an embedded servlet container that is configured to load the restful resources specified by the developer. In addition, the SpringServlet can be used to wire in the necessary beans if Spring is being used.

And, this is really super simple. The key is to extend the JerseyTest class and override the configure() method. In the configure() method you supply the same information that you would normally provide in your web.xml.

Line 5 : specify the package that contains the Jersey resource(s) you want to test
Line 6 : provide the name and location of the Spring context file (if using Spring)
Line 7 : turn on the JSON to POJO mapping feature if you want to use that

public class MyResourceWebServiceTest extends JerseyTest {

    @Override
    protected AppDescriptor configure() {
        return new WebAppDescriptor.Builder("com.mycompany.services")
            .contextParam("contextConfigLocation", "classpath:**/testContext.xml")
            .initParam("com.sun.jersey.api.json.POJOMappingFeature", "true")
            .servletClass(SpringServlet.class)
            .contextListenerClass(ContextLoaderListener.class)
            .requestListenerClass(RequestContextListener.class)
            .build();
    } // configure()
Once your test class is configured to spin up the embedded web container with your resources now it's time to write your tests. Again, the Jersey test framework makes it so easy even a caveman can do it.

On line 3 below we simply access a WebResource object and provide the relative URI to the resource we are interested in. This URI should match the @Path mappings in your Jersey resource definition.

Once the WebResource is defined simply use it to build and execute the HTTP request for the desired HTTP method, in this case GET, as shown on line 6. That's it. All that's left to do is the standard JUnit stuff to validate the response.
    @Test
    public void someTest() {
        WebResource webResource = resource().path("/some/resource/17");
        ClientResponse response =  webResource
            .accept(MediaType.APPLICATION_JSON)
            .get(ClientResponse.class);

        assertEquals(200, response.getStatus());

        try {
            JSONObject obj = new JSONObject(response.getEntity(String.class));
            assertEquals("widget", obj.get("type"));
        } catch (JSONException e) {
            fail(e.getMessage());
        }
    } // someTest()

Now, push a button or hit a key or two to kick off your JUnit test suite and watch your Jersey web services and tests fly.  If you need to make a change it only takes a minute or two to modify your code and run the tests again.

One piece of advice - create a test specific Spring context file targeting the exact REST resources you want to test and, if your resources eventually end up accessing some datasource (most would), consider injecting mock data access objects into your Spring beans so you can easily control the data that your resource would have access to, thus easily facilitating your testing (and development) and making your tests repeatable.

See this post if you want to learn how to easily create hyperlinks in your Jersey REST services.

See this post if you want to see more examples of Jersey unit testing or comparisons of different ways to marshall your data/objects.

Wednesday, February 27, 2013

How to return a Location header from a Jersey REST service

If you're following the Resource Oriented architectural style (ROA) for REST you're often interested in building and returning hyperlinks to your resources in your web service responses.

In the case of an HTTP CREATE, in addition to returning an HTTP 201 response code, you're also going to want to return a hyperlink to the newly created resource in the Location header of the response.

The Jersey JSR 311 implementation makes this a trivial task.  The first step, as you can see in line 2 below, is to inject a UriInfo class member using the Jersey @Context annotation.  Jersey recognizes a number of different resources that can be injected into your service classes via the @Context annotation.  In this case we're interested in information about the URI of our web service.

Once you've completed the work of creating your new resource (whatever that happens to be) and you're ready to formulate a response it's a simple matter to create the hyperlink and place it in the Location header of the response.  The key is to get the absolute URI to this current service as we're doing in line 21 below.  And assuming your URI convention is to tack the ID on to the URI for the CREATE service (as it probably should be in REST) simply append the ID to the absolute URI and use the Jersey Response builder to complete your response.

The hyperlink we just created should look something like http://mydomain/services/resource/1234 and map over to the GET-mapped service shown below starting on line 34.

    @Context
    private UriInfo _uriInfo;
  
    @Path("/resource")
    @POST
    public Response createResource(String data) {
        Response response = null;

        try {
            // convert data to model object
            Model model = someConversionMethod(data);
            // save model object
            _businessManager.saveModel(model);

            // formulate the response
            response = Response.status(201)
                .header(
                    "Location",
                    String.format(
                        "%s/%s",
                        _uriInfo.getAbsolutePath().toString(),
                        model.getId()
                    )
                )
                .entity(model.getId())
                .build();
        } catch (Exception e) {
            response = Response.status(500).entity(e.getMessage()).build();
        }

        return response;
    } // createResource()

    @Path("/resource/{id}")
    @GET
    public Response getResource(@PathParam("id") String id) {
        ... 
See this post if you want to learn how to easily test your Jersey REST services.